Follow Me On Social Media!
Cookies That Melt in Your Mouth: The Best Homemade Recipe
Introduction to Thumbprint Cookies with Jam
There’s something undeniably charming about thumbprint cookies with jam. The moment you take a bite, the blend of buttery cookie and sweet, fruity filling creates a delightful experience that feels like a warm hug on a chilly day. These special cookies often remind us of childhood memories spent in the kitchen with loved ones, carefully rolling the dough and creating indents for the jam.
What makes thumbprint cookies stand out is their balance of textures and flavors. The exterior is beautifully crisp, while the interior remains tender, offering a delightful contrast as you sink your teeth in. The swirl of jam introduces a burst of sweetness that varies based on your choice of fruit—be it raspberry, apricot, or even cranberry. This versatility makes thumbprint cookies not just a sweet treat, but a canvas for your creativity. You can even tailor them to suit the tastes of your friends and family.
The history behind thumbprint cookies is a fascinating one as well. Often believed to have European roots, they have made their way into various cultures with personalized twists. In some cultures, they might be made with nuts, while others may incorporate spices like cinnamon. This adaptability contributes to their ever-growing popularity in kitchens all over the world.
As you embark on making these delightful cookies, don’t forget to experience the joy of the process. The dough will come together beautifully, and watching the jam bubble slightly as they bake is the icing on the cake—err, the jam on the cookie! Whether you’re baking them for yourself or as a thoughtful gift, thumbprint cookies with jam are sure to elicit smiles and warm memories, making them a timeless favorite in any dessert repertoire.
What Makes Thumbprint Cookies So Special?
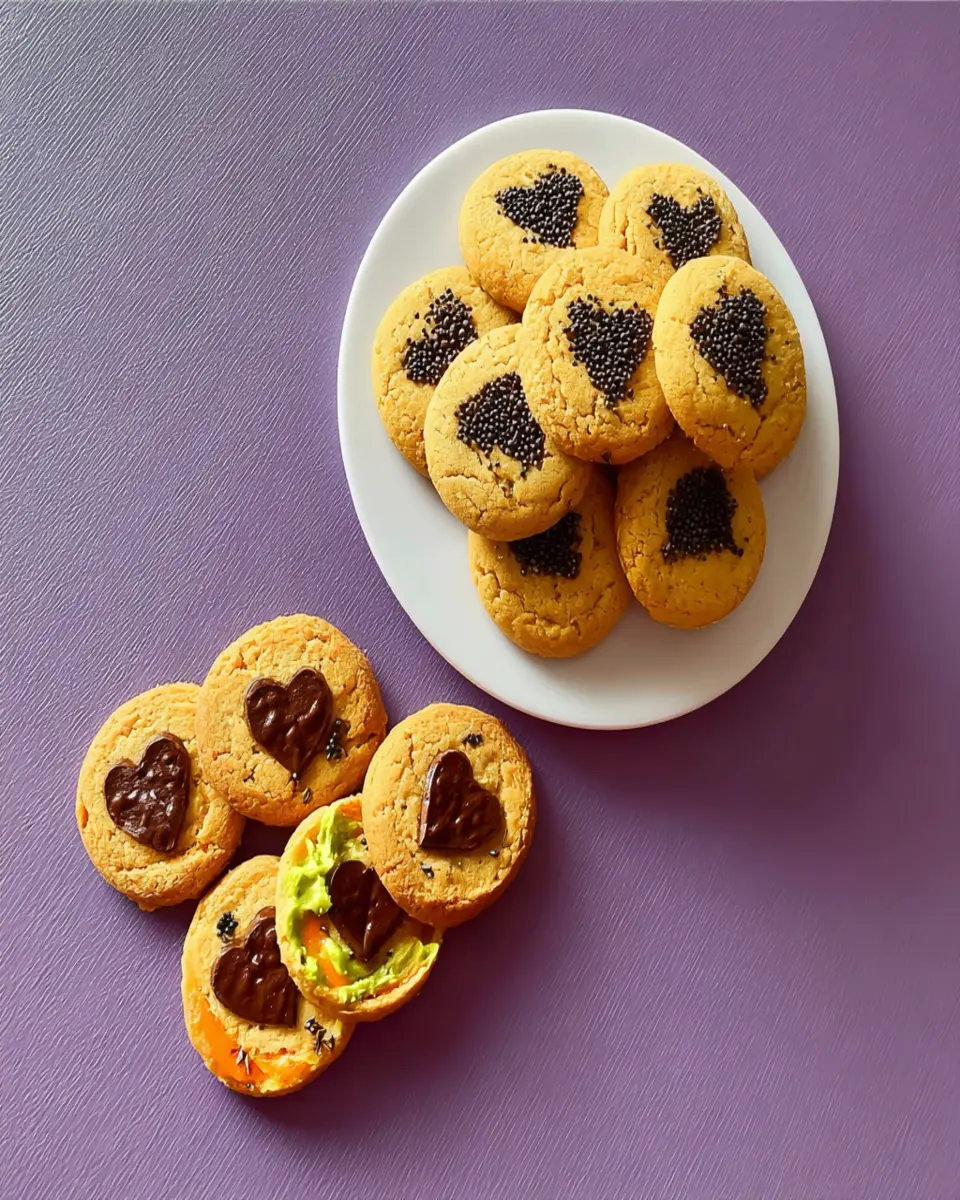
- Unique Shape: The distinct dimple in the center allows for generous jam placement, ensuring each bite is as flavorful as the last.
- Versatility: Feel free to experiment with various types of jam or even chocolate ganache for a modern twist.
- Heartfelt Tradition: They are a nostalgic recipe passed down through generations, often tied to family gatherings and special occasions.
These elements collectively render thumbprint cookies a beloved classic in the cookie world, embodying both creativity and cherished memories in every batch.
Key Ingredients for Thumbprint Cookies with Jam
Baking thumbprint cookies with jam is all about finding that delightful balance of flavors and textures. Each ingredient plays a vital role in crafting these sweet little gems that become a favorite at every gathering.
-
Butter: I always start with unsalted butter at room temperature. It adds richness to the cookies and ensures they have that melt-in-your-mouth quality. You might be tempted to use margarine, but trust me, butter truly elevates the flavor!
-
Sugar: Granulated sugar sweetens the base, while a sprinkle of powdered sugar on top adds a touch of elegance. It’s all about layering the sweetness perfectly for a balanced bite.
-
Flour: All-purpose flour is my go-to for thumbprint cookies. It creates the ideal texture, allowing the cookies to be soft yet sturdy enough to hold their shape when you press your thumb into them.
-
Eggs: Just one large egg helps to bind all the ingredients together. It contributes to the overall chewy texture that pairs so wonderfully with the jam filling.
-
Jam: The star of the show is, of course, your favorite jam! I find that raspberry or apricot works beautifully, but feel free to get creative—just ensure it’s of good quality for the best flavor!
Remember, each ingredient in your thumbprint cookies with jam is crafted for harmony, creating a delightful treat that everyone will adore!
Why You’ll Love These Thumbprint Cookies
When you think of classic cookies, chances are thumbprint cookies come to mind. Their charming, dimpled shape and sweet, vibrant jam center tend to evoke strong feelings of nostalgia. Perhaps they remind you of baking days with family or cozy afternoons filled with warm treats. These cookies are not just delightful to look at; they also offer a perfect blend of texture and flavor that you’ll adore.
-
A Simple Yet Delicious Recipe: The beauty of thumbprint cookies lies in their simplicity. With just a handful of ingredients, you can whip these up in no time. Plus, they’re incredibly forgiving, making them perfect for those who may not have a lot of baking experience.
-
Customizable Jams: One of the most enticing aspects of thumbprint cookies is how versatile they are. You can fill the indents with your favorite jams—be it raspberry, apricot, or even chocolate ganache. This variety allows you to tailor each batch to your taste preferences.
-
Perfect for Sharing: Whether it’s a family gathering or a friendly potluck, these cookies are simply a joy to share. Their visual appeal combined with a delightful taste makes them an instant crowd-pleaser. Trust me; once you start baking these delightful cookies, you’ll find it hard to keep them around!

Variations of Thumbprint Cookies
When you venture into the delightful world of thumbprint cookies, the options for creative variations are as vast as your imagination. Here are some tasty twists to elevate your homemade cookies:
Flavorful Fillings
-
Fruit Preserves: Classic thumbprint cookies often feature fillings like raspberry or apricot preserves, but why not get adventurous? Consider using lemon curd for a zesty kick or even coconut cream for an exotic touch. Each preserves blend gives a unique character to your cookies, marrying sweetness with slight tartness.
-
Chocolate Ganache: For those who can’t resist chocolate, a rich ganache is a fantastic alternative. Simply prepare a smooth mixture of heavy cream and chocolate, then fill the thumbprint wells for a luxurious treat that’s perfect for chocolate lovers.
Creative Toppings
-
Nuts and Sprinkles: After filling your thumbprints, consider rolling the edges in chopped nuts or colorful sprinkles before baking. The crunch of almonds or walnuts adds texture, while sprinkles bring a festive flair.
-
Coconut Flakes: Toasted coconut flakes bring a tropical vibe to your cookies, providing a sweet and chewy contrast to the chewy cookie base.
Combine Flavors
- Chocolate-Dipped: After baking, dip half of each cookie in melted chocolate and let them cool for a heavenly combination of flavors. You’ll get the richness of chocolate marrying beautifully with the sweet filling.
Each variation of thumbprint cookies tells a story, inviting you to experiment and find your perfect match. Remember, the key is to enjoy the process and create cookies that will bring smiles to those who taste them!
Cooking Tips and Notes for Thumbprint Cookies
Creating delightful thumbprint cookies is a cherished tradition that brings both nostalgia and satisfaction. As you embark on your cookie-baking journey, keep these tips in mind to ensure your cookies come out perfectly every time.
Choosing Your Jam Wisely
The filling is crucial for these cookies, so opt for high-quality jam or preserves. Using homemade jam can elevate your cookies, but store-bought works too. Berry jams like raspberry or strawberry tend to complement the buttery texture beautifully.
Chill the Dough
Before shaping your cookies, make sure the dough is chilled for at least an hour. This step not only makes it easier to handle but also prevents the cookies from spreading too much in the oven, resulting in a thicker, more satisfying cookie.
Experiment with Nuts
For added flavor and texture, consider incorporating finely chopped nuts into the dough. Almonds or walnuts can complement the sweetness of your filling and add a delightful crunch. Just be mindful of your dietary preferences and those of your guests.
Prepping Your Baking Sheet
Always line your baking sheet with parchment paper. This ensures easy removal of your cookies and prevents any sticking. It’s a small but effective step that makes cleaning up a breeze and keeps your cookies intact.
Baking cookies is not just about following a recipe; it’s about creating memories in your kitchen. Happy baking!

Serving Suggestions for Thumbprint Cookies
Thumbprint cookies are more than just sweet bites of joy; they can be the life of your gatherings or a comforting treat on a quiet evening. Imagine bringing a batch of freshly baked thumbprint cookies to a friend’s game night, where the burst of fruity jam meets the warm embrace of buttery dough.
Pairing with Beverages
To truly elevate your cookie experience, consider pairing them with drinks that complement the flavors:
- Tea: A warm chai or earl grey harmonizes beautifully with the sweetness of the cookies.
- Coffee: Brew a strong cup—espresso or a smooth latte can cut through the sweetness and enhance the flavors.
- Milk: The classic choice! A glass of cold milk balances the texture and enriches each bite.
Perfect for Occasions
These cookies are not just for snacking; they shine during special moments. They make an ideal addition to:
- Holiday cookie platters alongside other festive treats.
- Gift baskets for friends and family, creating a personal touch that shows you care.
- Potluck desserts, where their vibrant colors and flavors will stand out.
By blending these delightful serving ideas with your thumbprint cookies, you’ll create an inviting atmosphere that everyone will love!
Time Breakdown for Thumbprint Cookies
Making thumbprint cookies is not just about the delightful experience of baking but also about savoring each moment spent in the kitchen. Here’s a quick breakdown of the time it takes to whip up these flavorful treats.
Preparation Time
Getting ready for your cookie adventure takes about 15 minutes. This includes gathering your ingredients, mixing the dough, and shaping those little divots ready for filling.
Baking Time
Once your cookies are formed and set on the baking sheet, they need about 12-15 minutes in the oven. This is the time when your kitchen will be filled with an irresistible aroma, making the wait worthwhile!
Total Time
In total, you’re looking at about 30 minutes to enjoy freshly baked thumbprint cookies. This speedy process makes it a perfect treat for any occasion!
Nutritional Facts for Thumbprint Cookies
These delightful cookies are a staple in many households and come with a sweet balance of flavors and nutrients. Knowing the nutritional facts can help you enjoy them mindfully while savoring each bite.
Calories
Each thumbprint cookie contains approximately 100 calories. This makes it a reasonable treat if you’re looking to satisfy your sweet tooth without overindulging.
Protein
With about 1.5 grams of protein per cookie, they offer a small boost for your daily intake. While not a high-protein snack, every bit counts, especially when paired with a glass of milk.
Sugar
Each cookie has around 8 grams of sugar, which contributes to its delightful sweetness. This is moderate compared to many store-bought alternatives, making it a more satisfying homemade option.
Enjoy your baking adventure with these thumbprint cookies, and remember, balance is key!
FAQs about Thumbprint Cookies
Thumbprint cookies are delightful little treats that bring memories of my childhood baking sessions with grandma. These cookies are not just easy to make; they also allow for a delicious combination of flavors. If you’ve decided to whip up a batch of these sweet delights, you may have some questions. Let’s dive into the most common queries about these charming cookies.
Can I use different types of jam?
Absolutely! One of the best things about thumbprint cookies is their versatility. You can use any kind of jam or preserve to fill those delightful indents. Classic options like raspberry, apricot, or strawberry are popular, but don’t hesitate to try out unique flavors like orange marmalade or even chocolate spread. Just ensure the jam isn’t too runny, so it holds its shape while baking.
How do I store thumbprint cookies?
To keep your thumbprint cookies fresh, store them in an airtight container at room temperature. They should last about 5 to 7 days. If you want to keep them for longer, consider freezing them. Place them in a single layer on a baking sheet until they’re firm, then transfer them to a freezer-safe container. They can last for up to three months frozen.
What should I do if my dough is too dry/wet?
If your dough feels too dry, try adding a teaspoon of milk or an egg until it reaches the right consistency. On the other hand, if it’s too wet, sprinkle in a bit more flour until it’s manageable. Remember, the ideal dough should be soft enough to hold together but firm enough to hold its shape when rolled. Trust your instincts here; baking is as much about feel as it is about following a recipe!
Conclusion on Thumbprint Cookies with Jam
In the delightful world of thumbprint cookies, the combination of buttery richness and vibrant jam creates an irresistible treat that warms the heart. These cookies remind me of cherished family gatherings, where a platter of colorful delights sparks conversations and sweet memories. Baking these cookies is not just about enjoying a delicious snack; it’s about creating moments that you can share with family and friends. As you take your first bite, the buttery texture melts in your mouth while the sweet, tangy jam transports you back to the kitchen, filled with laughter. Try making these cookies today, and watch how they brighten your day!
Print
Thumbprint Cookies with Jam
- Total Time: 30 minutes
- Yield: Makes about 24 cookies 1x
Description
Enjoy your delicious thumbprint cookies with a delightful jam center!
Ingredients
Scale
- 1 cup unsalted butter, softened
- 2/3 cup granulated sugar
- 2 large egg yolks
- 1 teaspoon vanilla extract
- 2 cups all-purpose flour
- 1/2 teaspoon salt
- 1/2 cup jam or preserves (e.g., raspberry, strawberry, or your favorite flavor)
- Optional: Powdered sugar for dusting
Instructions
- Preheat the Oven: Preheat your oven to 350°F (175°C). Line a baking sheet with parchment paper.
- Cream the Butter and Sugar: In a large bowl, beat the softened butter with the granulated sugar using an electric mixer until light and fluffy, about 2-3 minutes.
- Add Egg Yolks and Vanilla: Beat in the egg yolks and vanilla extract until well combined.
- Mix in Dry Ingredients: Gradually add the all-purpose flour and salt to the wet ingredients. Mix until a soft dough forms.
- Shape the Cookies: Roll the dough into 1-inch balls and place them on the prepared baking sheet, spacing them about 2 inches apart.
- Create Thumbprints: Use your thumb or the back of a teaspoon to gently press an indentation into the center of each dough ball.
- Fill with Jam: Spoon a small amount of jam into each indentation.
- Bake the Cookies: Bake in the preheated oven for 12-15 minutes, or until the edges are lightly golden.
- Cool: Allow the cookies to cool on the baking sheet for 5 minutes, then transfer them to a wire rack to cool completely.
Notes
- Use room temperature butter for easier mixing.
- For a festive touch, dust the cooled cookies with powdered sugar.
- Experiment with different jam flavors or even Nutella for variety.
- Store cookies in an airtight container to maintain freshness.
- Prep Time: 15 minutes
- Cook Time: 15 minutes
- Category: Dessert
- Method: Baking
- Cuisine: American
Nutrition
- Serving Size: 1 cookie